Difference between revisions of "Cómo montar el robot RD1"
Jump to navigation
Jump to search
Jgvictores (talk | contribs) |
Jgvictores (talk | contribs) |
||
| Line 10: | Line 10: | ||
== Trucar servomotores == | == Trucar servomotores == | ||
| − | == Imprimir estructura == | + | == Imprimir estructura y ruedas == |
[https://github.com/asrob-uc3m/robotDevastation-robots/tree/master/rd1/mechanics En este enlace están todas las piezas excepto las ruedas (ficheros STL).] | [https://github.com/asrob-uc3m/robotDevastation-robots/tree/master/rd1/mechanics En este enlace están todas las piezas excepto las ruedas (ficheros STL).] | ||
| Line 16: | Line 16: | ||
[https://github.com/Obijuan/printbot_part_library/blob/master/wheels/Miniskybot-compatible/step-stl/Miniskybot-wheel-futaba3003-4-arms-horn-assembly.stl En este enlace están las ruedas diseñadas por Obijuan que hemos utilizado.] | [https://github.com/Obijuan/printbot_part_library/blob/master/wheels/Miniskybot-compatible/step-stl/Miniskybot-wheel-futaba3003-4-arms-horn-assembly.stl En este enlace están las ruedas diseñadas por Obijuan que hemos utilizado.] | ||
| + | == Instalar Raspbian en SD y rd1-software == | ||
| + | Todo esto mientras no tengamos la imagen lista, [https://github.com/asrob-uc3m/robotDevastation-robots/tree/master/rd1/software aquí el enlace a github]. Tocar rc-local para que se ejecute launchRd1. Próximamente: doxygen. Más adelante: imagen. | ||
| + | |||
| + | == Montar conexiones RPi-servo == | ||
| + | |||
| + | == Enganchar webcam == | ||
---- | ---- | ||
[[Cómo empezar con Robot Devastation|Volver a "Cómo empezar con Robot Devastation"]] | [[Cómo empezar con Robot Devastation|Volver a "Cómo empezar con Robot Devastation"]] | ||
Revision as of 19:53, 2 February 2015
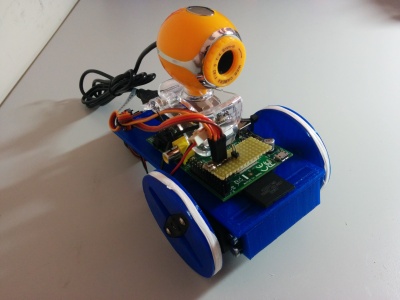
El robot RD1 es el de la figura. Dispone de los siguientes elementos.
- Dos servomotores trucados para rotar más de 360º.
- Un módulo wifi USB.
- Una webcam USB.
- Un mini-PC de tipo Raspberry Pi.
- Una estructura de soporte de los elementos, y una rueda anclada a cada servomotores.
Trucar servomotores
Imprimir estructura y ruedas
En este enlace están todas las piezas excepto las ruedas (ficheros STL).
En este enlace están las ruedas diseñadas por Obijuan que hemos utilizado.
Instalar Raspbian en SD y rd1-software
Todo esto mientras no tengamos la imagen lista, aquí el enlace a github. Tocar rc-local para que se ejecute launchRd1. Próximamente: doxygen. Más adelante: imagen.
